Single sign-on with OAuth & SAML for Cloud Platform
Overview
OAuth
OAuth is an authentication protocol which supports Single Sign-On (SSO) that streamline user access across various applications within an organization. SSO with OAuth enables your users to access the yellow.ai platform using their existing application login credentials, eliminating the need to re-enter them. It enhances security by enabling secure third-party access to user data without exposing login details, providing a seamless and efficient authentication process. Benefits of signing in through OAuth:
- Eliminates the need for direct sharing of login credentials, enhancing security.
- You can control and limit third-party access to your data.
- Proves adaptable to various scenarios in large-scale systems.
SAML
SAML (Security Assertion Markup Language) is an open standard for enabling single sign-on (SSO) across applications and services. It allows users to authenticate once with an Identity Provider (IDP) and gain access to multiple service providers without the need for repeated logins. This improves user experience and enhances security in Yellow.ai platform by centralizing authentication. Benefits of SAML Authentication:
- Reduces the risk of phishing attacks and password vulnerabilities by eliminating the need for multiple passwords.
- Enables users to log in once and access multiple applications without interruption.
- Simplifies and centralizes user management by delegating authentication to a trusted IDP.
SSO workflow

Basic terminologies
| Term | Description |
|---|---|
| Resource owner | The organization who wants to log in to Yellow.ai. |
| Client | Yellow.ai |
| Authorization server | The server issuing the access token, in this case, your application. |
| Resource server | The application that accepts the access token and must verify its validity. |
| Redirect URI | This URL is where the Authorization Server sends the user back after granting permission to the Yellow.ai client. |
| Response type | The type of information the Client (Yellow.ai) expects to receive. For this case, the Response Type will be "code" indicating an Authorization Code. |
| Grant type | Refers to the way an OAuth application gets the access token. In this case, the authorization code flow will be used. |
| Scope | Granular permissions the Client (Yellow.ai) wants, such as access to data or to perform actions. For this case, openid, profile, and email are required scopes. |
| Consent | The Authorization Server verifies with the Resource Owner (user) whether they want to give the Client (Yellow.ai) permission. |
| Client ID | This ID is used to identify the Client (Yellow.ai) with the Authorization Server. Provided by Authorization Server to Client (Yellow.ai). |
| Client secret | A secret password known only to the Client (Yellow.ai) and Authorization Server, allowing secure information sharing. Provided by Authorization Server to Client (Yellow.ai). |
| Authorization code | A short-lived temporary code the Client (Yellow.ai) gives the Authorization Server in exchange for an Access Token (valid for one-time use with a maximum lifetime of 10 minutes). |
| Access token | The key used by the Client (Yellow.ai) to communicate with the Resource Server. Similar to a badge or key card, it grants permission to request data or perform actions with the Resource Server on behalf of the Client (Yellow.ai). |
| OAuth application | The entity created by the Authorization Server containing details (such as Client ID, Client Secret, Redirect URL, etc.) corresponding to a specific OAuth client. |
Configure OAuth sign-in
To configure OAuth, follow the steps below:
Step 1: Set Up OAuth in IDP
Ensure the your Identity Provider (IDP) supports OAuth.
Configure OAuth settings in the client's IDP:
- Create a new OAuth client application.
- Whitelist the following redirect URLs on your IDP's OAuth app:
https://cloud.yellow.ai/api/sso/oauth/handle-redirecthttps://app.yellow.ai/api/sso/oauth/handle-redirect
- Obtain client ID, client secret or other necesary details (step #2).
Steps to retrieve details from a few common identity providers are outlined below:
| Identity provider | Values required to set up SSO for yellow.ai | Step-by-step guide |
|---|---|---|
| Okta | Okta domain Client ID Client Secret | Click here |
| Red Hat | Realm Client ID | Click here |
| Client ID Client Secret | Click here Note: Select openid, userinfo.email and userinfo.profile under scopes on the Create Consent Screen. | |
| Microsoft AzureAD | Client ID Client Secret Tenant ID Tenant Domain | Click here 1. Sign in to Azure AD. Click on App Services and select Manage Azure Active Directory. 2. In the left navigation, go to App registrations and click New registration. 3. On the registration page, provide application details. Choose web as the Redirect URI and input the redirect URLs. 4. Click Register. Azure AD will assign a unique Application ID (Client ID) to your application. Copy the Application ID and Directory ID (Tenant ID). 5. Navigate to Certificates and Secrets, click New Client Secret. Enter a description, set expiration, and click ADD. This will be your Client Secret key. |
| SAML integration | IDP Name IDP description IDP login URL Entity ID Email domain IDP Certificate (in Certificates) |
Watch this video on how configure your identity provider (Microsoft AzureAD) and fetch details for yellow.ai SSO configuration:
If your identity provider isn't configured in yellow.ai for SSO, share OAuth details directly with yellow.ai's support team.
Configure Okta for SAML Integration with Yellow.ai
To enable Single Sign-On (SSO) using Okta, follow the steps below to configure your Okta application with the appropriate SAML settings required by Yellow.ai.
Prerequisites
Admin access to your Okta dashboard
SAML configuration details provided by Yellow.ai, including:
- Single Sign-On (SSO) URL
- Relay State (optional)
Step 1: Access the Okta Admin Console
- Sign in to your Okta Admin Console.
- From the left sidebar, navigate to Applications.
Step 2: Create or Select an App
If no app is configured yet:
- Click Create App Integration.
- Choose SAML 2.0 as the sign-in method.
- Click Next.
If an app is already available:
- Select the existing application you want to configure for Yellow.ai.
Step 3: Configure SAML settings
When creating an app
Enter a recognizable App Name (e.g., Yellow.ai Integration).
Upload an optional logo if needed, then click Next.
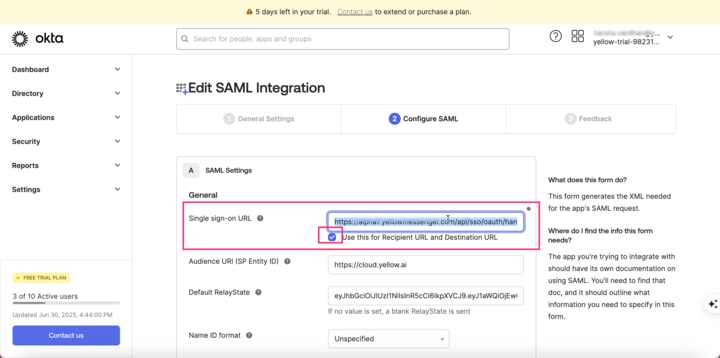
In Single sign-on URL, enter the URL provided by Yellow.ai (
https://cloud.yellow.ai/api/sso/oauth/handle-redirect)Check the option: ✔ Use this for Recipient URL and Destination URL
In Default Relay State, paste the value provided by Yellow.ai (if available).
In Attribute statements, add Firstname and Email attributes.

When updating an existing app
If your Okta app is already set up:
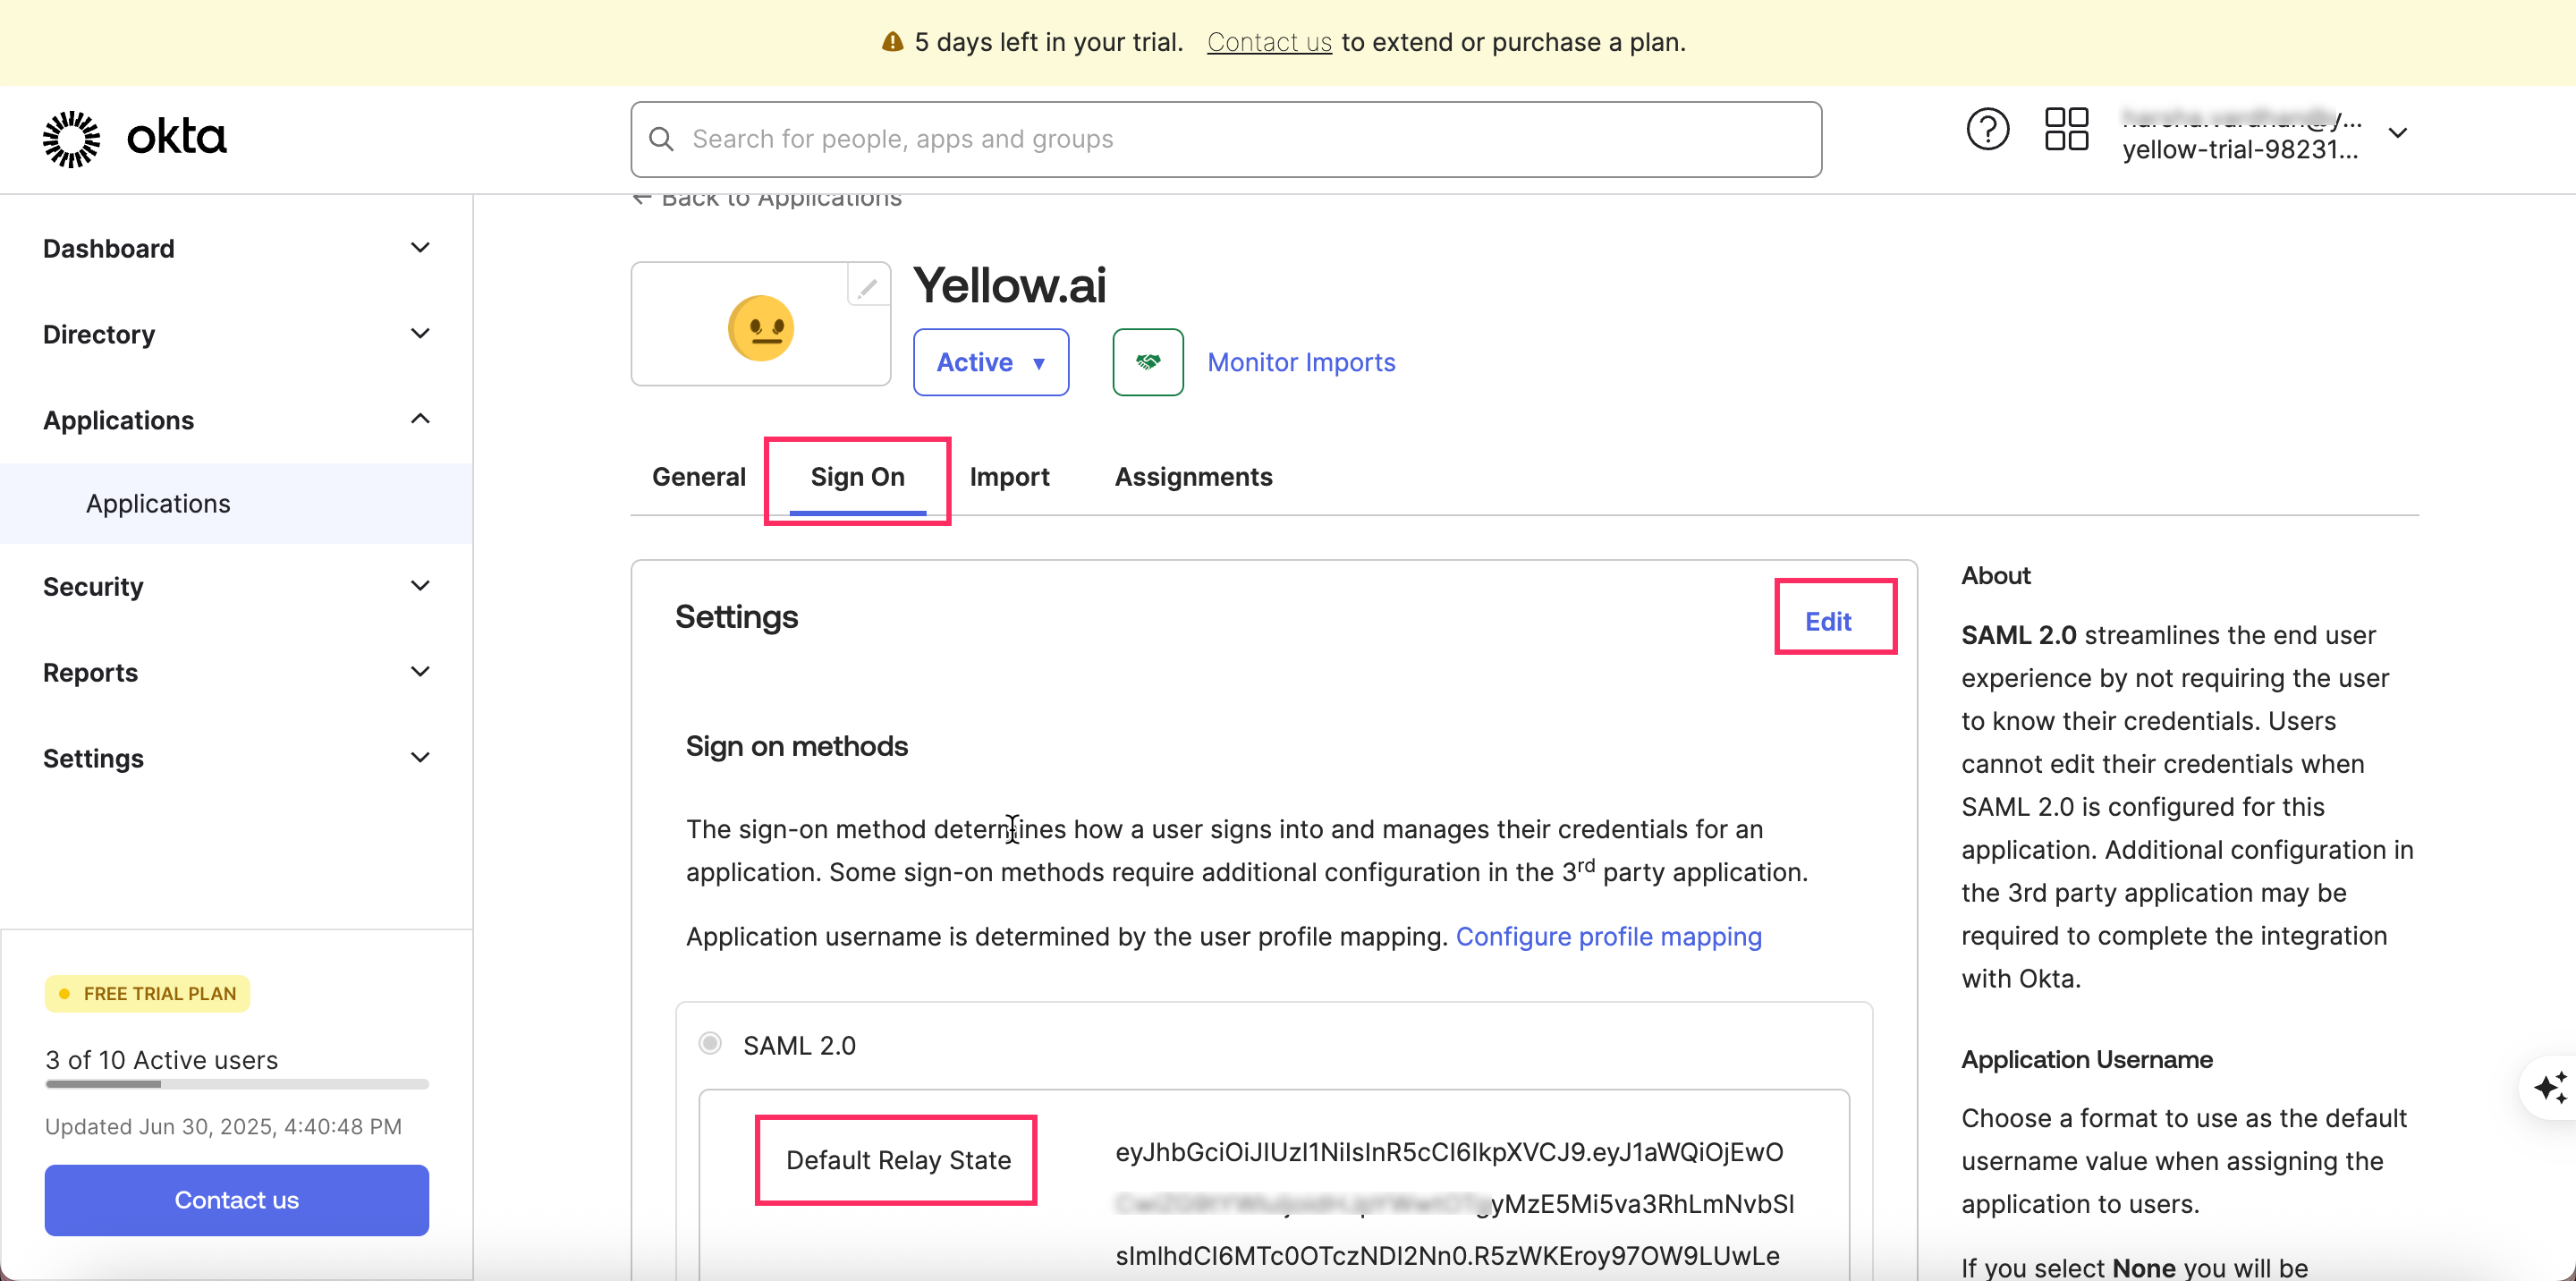
Go to Applications and select the relevant app.
Under the General tab, click Edit and update the Single sign-on URL with the Yellow.ai URL.
Navigate to the Sign On tab and click Edit.
Replace the Default Relay State with the value shared by Yellow.ai.
Step 4: Save the changes in Okta.
Step 2: Share OAuth setup details
Once you have set up your IDP, share the following details (fetched from your identity provider) with our support team at [email protected]:
| Field | Description |
|---|---|
| Your email address associated with the platform. | |
| API Version | The version of the OAuth API being used. Ensures compatibility between the platform and the OAuth service. |
| Scope | The extent of access requested. Specifies resources or actions the application seeks permission to access. |
| Domain | The domain name configured for OAuth, used to identify and access the platform. |
| Client ID | A unique identifier assigned by the OAuth provider to recognize and authorize the application. |
| Tenant ID | Identifies the instance or organization within the OAuth provider, relevant for multi-tenant systems. |
| Auth URL | URL where users are redirected for authentication and authorization. |
| Token URL | URL where the platform obtains the OAuth access token after user authentication. |
| Token scope | Defines the level of access the access token has. |
| User Info URL | URL to retrieve additional information about the authenticated user. |
| Client Secret | A secret known only to the application and the OAuth provider for authentication during token requests. |
After verifying your details, SSO will be enabled for your domain by the yellow.ai team.
Step 3: Sign-in using OAuth
- Login to cloud.yellow.ai
- Enter the domain name configured for OAuth by the Yellow support team. Click on the Sign with OAuth button.
- You will be redirected to the third-party tool, where you can log in using its credentials to log in to the Yellow platform.
Step 4: Create your bot
Once OAuth is enabled, create a bot. In the URL, locate and copy the botId (separate for live/production). This botId is required for providing access and assigning roles.

Role-based access through OAuth
Yellow.ai platform supports various user roles, such as developer, agent and admins. You can configure different roles within your OAuth app and assign users to each role as per your requirement.
To enable role-based access for your OAuth set-up, follow these steps:
Prerequisite: Configure OAuth sign-in and fetch your bot ID.
Step 1: Add user roles in IDP
Add roles in your respective identity provider app. Following are the supported user roles in the yellow.ai platform:
- Admin (Bot admin)
- Agent (Inbox agent)
- Developer (Developer)
- InsightsUser (Insights user)
- EchoAdmin (Inbox admin)
- Approver
- Tester
- Database (Database viewer)
- EngagementAdmin (Engage admin)
- EngagementUser (Engage viewer)
Super admin role is automatically created and assigned to the primary email address of the bot when the bot is created. It cannot be assigned through role mapping or the yellow.ai UI. Learn more about other user roles here.
Syntax to add user roles in the identity provider app: botId.{role}
Example: x1599503999999.admin
Syntax to provide table and read/write access to database users:
- For App and Cloud (legacy tables):
botId.database.{tableName}.{accessType} - For Cloud (v2 tables):
botId.database.{tableName}:v2.{accessType}
accessType can have one of the following values:
readfor viewing the respectivetableName. Ex:x1599503999999.database.feedback.read,x1599503999999.database.users.writewritefor performing editing operations on the respectivetableName. Ex:x1599503999999.database.users:v2.read,x1599503999999.database.feedback:v2.write
Step 2: Assign users to roles in IDP
Once the roles are added to your IDP, you can assign users to each role. Steps to add user roles differ for each identity provider, follow the steps mentioned by the provider itself. For example, this guide is for Microsoft AzureAD.
The following video demonstrates how to assign users to a user role in Microsoft AzureAD.
If your identity provider isn't configured in yellow.ai for SSO, share OAuth details directly with yellow.ai's support team.
Step 3: Share user role details with yellow.ai
Share the following information with the support team at [email protected]:
- OAuth details if the identity provider is not configured in yellow.ai for SSO.
- Roles or groups created in user details (retrievable on yellow platform through the
/userinfoendpoint). Also, share the key associated with passing role values. Refer to the legend below for the correct role attribute based on your identity provider:
| Identity Provider Type | Role Attribute |
|---|---|
| Azure Active Directory | Roles |
| Okta | Groups |
| Auth0 | As configured on the identity provider (dynamic value) |
| Ping Identity | As configured on the identity provider (dynamic value) |
Testing what user details are retrieved from your OAuth using /userinfo endpoint
To know what user details are retrieved by the SSO, make an API request to the GET /userinfo API.
The JSON response includes the following data - email, roleAttribute, given_name, and roleAttribute. If a user is assigned to multiple roles across various AI-agents, you will observe the list of role attributes along with their associated bots presented as an array within the roleAttribute field, as demonstrated in the following response.
{
  "email": "[email protected]",
  "family_name": "Steve",
  "given_name": "Smith",
  "roleAttribute": ["x1597777777777.admin", "x1597777777777.agent", "x1607777777777.admin", "x1607777777777.developer"]
}
Once OAuth role mapping is enabled, the role update UI (s setting > Access control) on the yellow.ai platform will be disabled. Roles can only be updated from the identity provider, and users will be assigned updated roles at the time of login.